Showing posts with label how to. Show all posts

Sunday, December 5, 2010

Recipe: Tiramisu

This year for Thanksgiving, I decided to try my hand at something on my 101 list... homemade tiramisu! It was a bit of a daunting task but I was quite content with the results.

I used this recipe from Chef's Pencil because it was a "no-cook" and the YouTube video below made it look pretty simple.


Here is my modified recipe:
For The Tiramisu
  • 6 Egg Yolks
  • 4 Egg Whites
  • 2 ounces of sugar
  • 12 ounces grams mascarpone cheese
  • 1/2 cup fresh cream
  • 2 cups coffee (cooled to room temperature)
  • 1 cup Kahlua
  • Approx 48 ladyfingers (savoiardi biscuits)
  • 9x13 inch dish
  • Electric cake mixer
Notes on ingredients: I have the great fortune to be a Californian, so I was able to purchase the mascarpone cheese and ladyfingers from Trader Joe's. I'm also not a coffee drinker, so I used what I had on hand -- two packets of instant coffee mix that happened to be vanilla latte flavored. This, combined with the Kahlua, made the tiramisu turn out very sweet despite my cutting the sugar in 1/3.

Also, most tiramisu recipes call for rum, but you can substitute just about any liqueur for it. I chose Kahlua because I would actually drink the rest of the bottle and the coffee cream Kahlua would get a little more "coffee flavor" in it, since it wouldn't have much otherwise.

Steps:
  • Add the egg yolks & half the sugar to mixer bowl
  • Whisk on high speed until light & creamy
  • Add the mascarpone cheese & mix on medium speed, until just combined
  • Add the cream and whisk for approximately another 2 minutes (until thick & creamy)
  • Use a new mixing bowl and dry the whisk
  • Pour the egg whites into the mixing bowl
  • Whisk on high speed until soft peaks
  • Continue whisking and slowly add remaining sugar (1 tablespoon at a time)
  • Continue whisking until stiff peaks
  • Remove the bowl from the mixer and fold half of the egg whites into the cream mixture in the large bowl
  • Once they are just combined fold through the remaining egg whites
  • Add the Kahlua to the coffee
  • Soak the biscuits in the coffee mix one at a time for a few seconds, drain and arrange in the dish
  • Once one layer of biscuits is completed in the dish, spread on an even layer of the cream mixture
  • Place another layer of soaked biscuits on the cream
  • Top and spread with a final layer of the cream
  • Smooth the top and garnish with some freshly grated quality chocolate -- I used one of my favorites -- sugar free Amberlyn dark chocolate mint
  • Set in the fridge for at least 3 hours.
  • To make individual portion servings, simply break biscuits into appropriate smaller size before soaking and prepare in the same way as above but in each glass or bowl
Notes: It might have something to do with the particular brand of ladyfingers I was using, but "soaking it for a few seconds" wasn't very effective in allowing the coffee/Kahlua to seep through the entire biscuit. It was more effective to dip it and shake the ladyfinger around a little in the liquid.

Some people may have concerns about the raw egg, but I don't think it had much of an impact on the finished product. Most likely, I will try my hand at the cooked one next time and possibly a variant of hot chocolate in place of coffee.

Here is one of the individual servings I made with the leftover ingredients. (The recipes calls for 12 oz and the marscapone cheese at Trader Joe's comes in 8oz so I bought two and made some extra.) Perfect afternoon snack.

Enjoy!

Monday, January 18, 2010

101 in 1001


(via icanread)

Starting last New Year's, Clement and I vowed not to make any more resolutions. Resolutions are vague, you forget about them, and they are never accomplished for want of "somedays." Instead, we decided we were going to be goal-setters with deadlines. We have a collaborative 101 in 1001 list on Google Docs, that we check in on every couple of weeks.

What is 101 in 1001?
It's a list of 101 things you want to accomplish in 1001 days, roughly 2 and 3/4 of a year.

Like what?
Everyone's goals are different. I Googled "101 in 1001" when I was making my list to get some ideas. I used a couple of cop-out goals, like "Finish writing 101 in 1001" and write another "101 in 1001," but most of them are sincere goals. Like the examples I found, I left a couple of blank spaces for this year (2010) and next year (2011) in case I come up with new things.

How do you get started?
The main concept behind 101 in 1001 is to create measurable goals. Consider using the SMART method - Specific, Measurable, Attainable, Relevant, and Timely. Remember that it is not a list of short-term accomplishments. For example, instead of "Lose 10 pounds," try something like "ride my bike to work 3 times a week for 100 weeks." Instead of "be nicer to my sister," try "take my sister out to dinner 10 times."

Do you have suggestions for writing it?
I think that every list I have seen has broken it down into sections like Finance, Try New Things, Family, etc. Remember they have to be concrete goals -- measurable and can be checked off once complete.

Can I see yours?
Clement and I have a collaborative list and some of it is quite personal between us so I can't share my list publicly. I have seen some people share theirs on blogs and it's a great way to stay accountable on your lists. Here are a couple examples off my list:
13. Host a potluck
20. Join Toastmasters
21. Complete Toastmasters Competent Communicator (CC) certificate
26. Read 25 new books
39. Make vanilla extract at home (Shanna)
44. Take a trip out of the state [1/1] - Vegas 2008
76. Go to a renaissance fair [0/1]
77. Go to a Lakers game [0/1]

(Black is for things we've completed, blue -In Progress, and red -Haven't Started.)

Instead of resolutions, why not make concrete goals and organize a list of the things you've always wanted to do? Don't wait for Someday, make it happen today!

Friday, November 27, 2009

How to Remove Sticky Labels

Personally, my tried-and-true method is to use a blow-dryer. Just aim the heat all over the label for about 5-10 mins. It will dry out the adhesive and the entire thing will come off in one clean piece. Test one little corner after a couple minutes before removing the entire thing. You will not believe how easy and smooth this is.

LifeHacker also suggests using peanut butter or a standard pink eraser to get rid of the leftover gunk. Sharon Cole, of A Dream Wedding, told me that Goo Gone is her best friend when it comes to removing extra gunk when you're on the go (which a wedding coordinator always is).

But I've never had any extra gunk left over from my tried-and-true method... just saying. ;-)

Keep this in mind when removing the price tags over the next few weeks as you prep for the holiday!

Monday, November 16, 2009

Vanilla Extract Project

After sitting on this idea for several months, I finally decided to start my Vanilla Extract Project a.k.a. homemade vanilla extract. I read a lot of variations on the recipe so I just kind of... meshed them together. Here's my version!

Step 1: Round up your supplies.
Supplies (left to right, clockwise):
  • Measuring cup - actually, this was just for making pouring easier. I didn't measure the exact amount that went into each bottle but they held about half a cup of liquid.
  • Funnel - unless you're extremely patient and have excellent hand-eye coordination, you need this for pouring. I am not.
  • Alcohol - I used vodka but I read that rum and gin were also popular choices. I chose Belvedere because a State guy once swore by it while making fun of Grey Goose. (And we all know those SDSU kids know their alcohol. =P)
  • Vanilla Beans - I got Rodelle vanilla beans from Costco, which come in these 2-pack fancy glass containers of 5 each. (10 beans, for I believe $12.something.) These beans were okay but I liked the organic ones I got from the food co-op better, so next time I will probably not get the Costco ones again.
  • Vinegar/Oil bottles - I got mine at Michael's crafts... Sorry I don't remember the exact price but they are definitely reasonable, plus it comes with the cork.
  • Cutting board and knife - self-explanatory.
Step 2: Cut your vanilla beans length-wise.

(I had no idea this was vanilla looked like before I did my first vanilla project... I bet you never knew vanilla beans were really just the little tiny black specks in your vanilla ice cream. Vanilla not looking so bland anymore, is it?)

Step 3: Use one vanilla bean per bottle and carefully pour the vodka in each one. Pour slow! You don't want to spill a bunch of vodka like I did. =(

Step 4: Cork your bottles tightly and store in a cool, dark place out of sunlight. The proportion I used is 1/2 cup vodka to 1 vanilla bean, so according to the websites I read, this will be ready to use in about 8 weeks.


The vodka started changing color less than 5 minutes after I finished corking them all. You can see a slight yellowish tinge in these pictures. Since the liquid is less in these bottles, it will be stronger extract. For a weaker extract, use 1 cup of liquid or just half of a bean. It will be a very dark brown when it's ready to use.

Have you ever made vanilla extract? How was it?

Monday, October 19, 2009

A Guide to Food Photography

Look what I found! An amazing walk-through on how to do food photography from Matt Wright, at wrightfood!


Matt talks about camera choices, image formats, and most importantly lighting and composition in this thorough how-to, which really only covers the basics of photography! Thanks Matt!

Me, I'm still using my little Canon PowerShot (which I love, actually) but I'm definitely going to make good use of the tips on lighting.

Friday, September 25, 2009

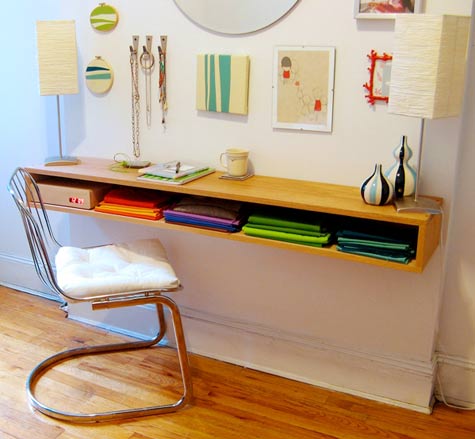
Maggi’s Minimalist Oak Desk

I was browsing through this DIY Life article about decorating ideas for small spaces, figuring it may come in handy even in moderate-sized space just to keep that wide, open look. And I totally fell in love with this minimalist desk.

(image via Design*Sponge)

This would be perfect for your drop-off zone -- charging station on one side, mail organization on the other maybe? A small mirror for last-minute touch-ups before you go out the door, perhaps?

Full DIY guide by Maggi at Design*Sponge.

Monday, September 14, 2009

Weekend Finds

Adorable radish mushroom how-to (from Brenda)
(note: the hand in the photo is Brenda's, not mine. =P)

Star Wars Then and Now

Tauntaun sleeping bag (also Star Wars), via thinkgeek

Shiny, new stainless steel iPod shuffle

The correct way to dispose of your old credit cards to prevent identity theft. (via LifeHacker)

Loving this new blog - You'd Be Pretty If... (via Already Pretty)

Joanna has return from her honeymoon! Welcome back!

This giant rubber duckie is amazing.

How to make roses out of maple leaves

Top 25 "Most Badass Personal Finance Blogs"


Blog Widget by LinkWithin